Capture Calibration
Scanners are calibrated by setting parameters in the NanoScope software using the Capture
Calibration command. The basic calibration procedure using a 10 μm pitch calibration reference is described below.
- With the Scan Rate set to 2.44 Hz and Number of Samples parameter to 256, a full Capture
Calibration requires approximately 60 minutes.
NOTE: Increasing the Number of samples or decreasing the Scan rate significantly
increases the required time but should be considered if your typical
measurements are at higher resolution or slower scan rates.
- Select Capture > Capture Calibration. The Capture Calibration
dialog box lists twelve parameters used in the calibration procedure:
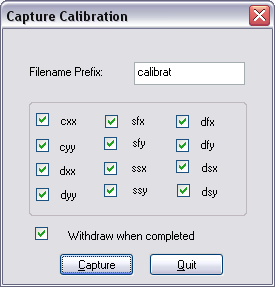
- If this is a first time calibration, or if the microscope’s calibration has not been checked
within the last three months, verify that all parameters are selected. Otherwise, select those
you need.
- Change the Filename Prefix if desired.
- Click Capture to initiate the automatic calibration routine.
NOTE: The microscope begins an automatic series of scans on the reference which
require approximately one hour to complete. During each scan, the scanner
moves the piezo using carefully calculated movements. Many of these
movements are unusual, giving rise to a variety of images which do not
resemble the normal reference. For example, pits may resemble trenches and
features may be presented at various angles.
- As each routine is executed, adjust the scan slightly to optimize the calibration image using
the Capture Control dialog box displayed on the control monitor throughout the calibration
routines:
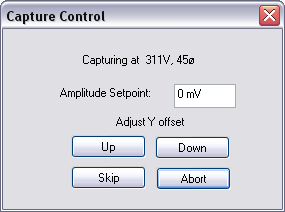
NOTE: The capture status will begin at skip 2. The program skips the current scan plus
one more before capturing an image for later calibration. This allows hysteresis
and drift to settle out when the scan changes direction and size between images.
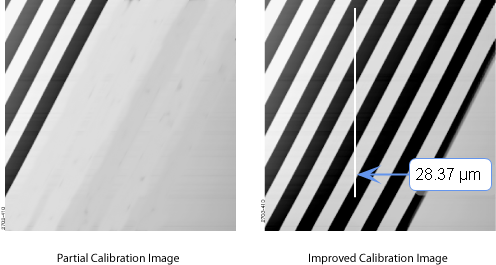
- For cxx, cyy, dxx, dyy images, if portions of features are missing, or if the image is blank,
click repeatedly on Up, Down, Left or Right to adjust the scan until more of the features are
imaged. Features should extend across as much of the displayed image as possible:
NOTE: After the first four images with the diagonal stripe pattern are captured, you can
leave the system unattended while the program continues to completion. Some
of the following images appear stretched in one dimension; however, this is
normal.
- If the scan has not stabilized by the time the capture status changes to Forced, click Skip to
increment the capture to skip the current scan.
NOTE: Do not click on Abort unless you want to stop the entire Capture Calibration
program.
- Once the image is optimized, allow the software to capture the entire image without
disturbing it. The software automatically indexes to the next image. Once all calibration
images are obtained, the software prompts the user that it is finished.
- Go to the directory where all Capture Calibration files are saved.
- Select View > Browse or click Browse to review all Capture Calibration files.
- Verify that all calibration images contain features spanning the full width and height of the
image frame (as in the right-hand image above).
- Recapture all images unsuitable for calibration. Record the file name extensions for all
unusable files (e.g., .cxy, .dyy), then delete the files.
- Re-engage on the reference surface and select Capture Calibration.
- Verify that the file name prefix is identical to that of the usable files. Remove the “x” from
all file name extensions except for the unusable file names recorded in Step 13.
- Finally, click Capture to recapture the selected files.
- Proceed to the Auto Calibration process.
| www.bruker.com
|
Bruker Corporation |
| www.brukerafmprobes.com
|
112 Robin Hill Rd. |
| nanoscaleworld.bruker-axs.com/nanoscaleworld/
|
Santa Barbara, CA 93117 |
| |
|
| |
Customer Support: (800) 873-9750 |
| |
Copyright 2010, 2011. All Rights Reserved. |
Open topic with navigation